Core Data 101
What Is Core Data?
Core Data is a framework that you use to manage the model layer objects in your application. It provides generalized and automated solutions to common tasks associated with object life cycle and object graph management, including persistence.
— Core Data Programming Guide
Apple explicitly states Core Data as a framework for managing your model layer objects. Persistence is only one of the features. Core Data is not a database.
Besides persistence, Core Data also provides:
- Change tracking and undo/redo.
- Relationship consistency.
- Lazy loading.
- …and more.
Core Data Stack
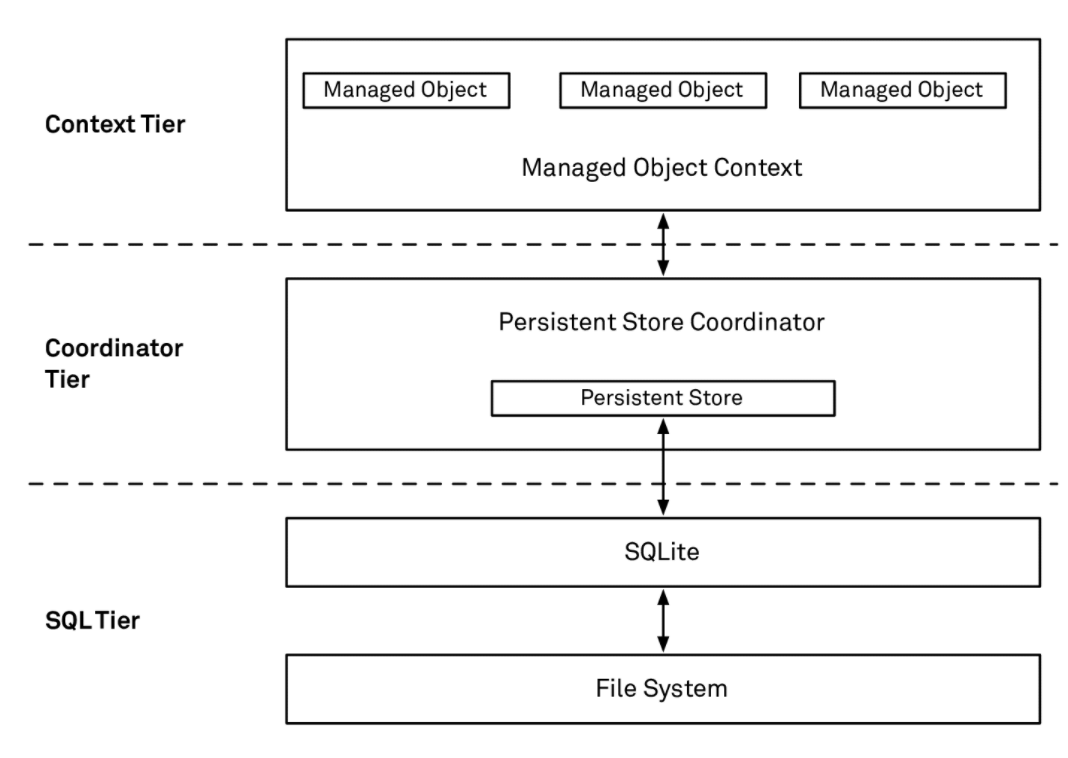
Core Data operates as a stack, roughly like this:
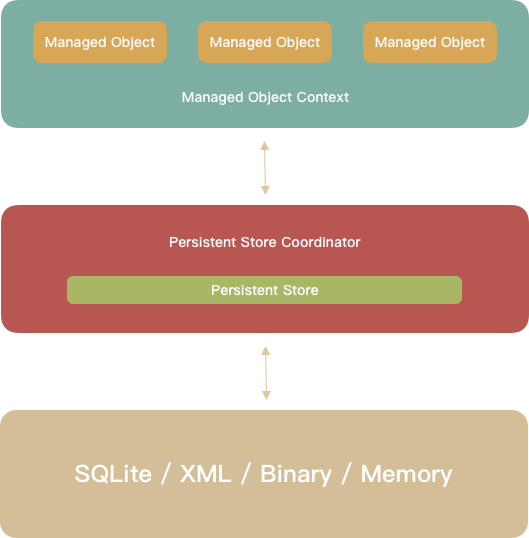
From top to bottom:
- Managed object: your actual model objects.
- Managed object context (MOC): the context those objects live in. You use it to create, edit, and track changes to managed objects.
- Persistent store coordinator (PSC): the MOC talks to the PSC to read/write data. The PSC bridges between contexts and the underlying persistent stores.
- Although the diagram shows a single store, a coordinator can manage multiple persistent stores. The PSC provides a unified API to the MOC so that, from the MOC’s perspective, it looks like one store.
- The PSC also coordinates concurrent reads/writes across threads.
- Persistent store: the actual storage. Core Data ships four store types: SQLite, XML, binary, and in‑memory. In practice, SQLite is by far the most common, so that’s what this post focuses on.
Working with Core Data starts with initializing this stack. The official documentation show both storyboard‑driven and code‑driven setups. And then 99% of your time is spent interacting with the top of the stack: managed object contexts and managed objects.
Designing the Model
Core Data stores structured data, so the first step is designing your model. This is similar to designing a database schema:
- Which models do we need?
- What fields does each model have?
- What relationships exist between models?
Xcode provides a visual Model Editor for designing models. You create an .xcdatamodeld file and then configure entities, attributes, and relationships in the GUI. Here’s what it looks like:
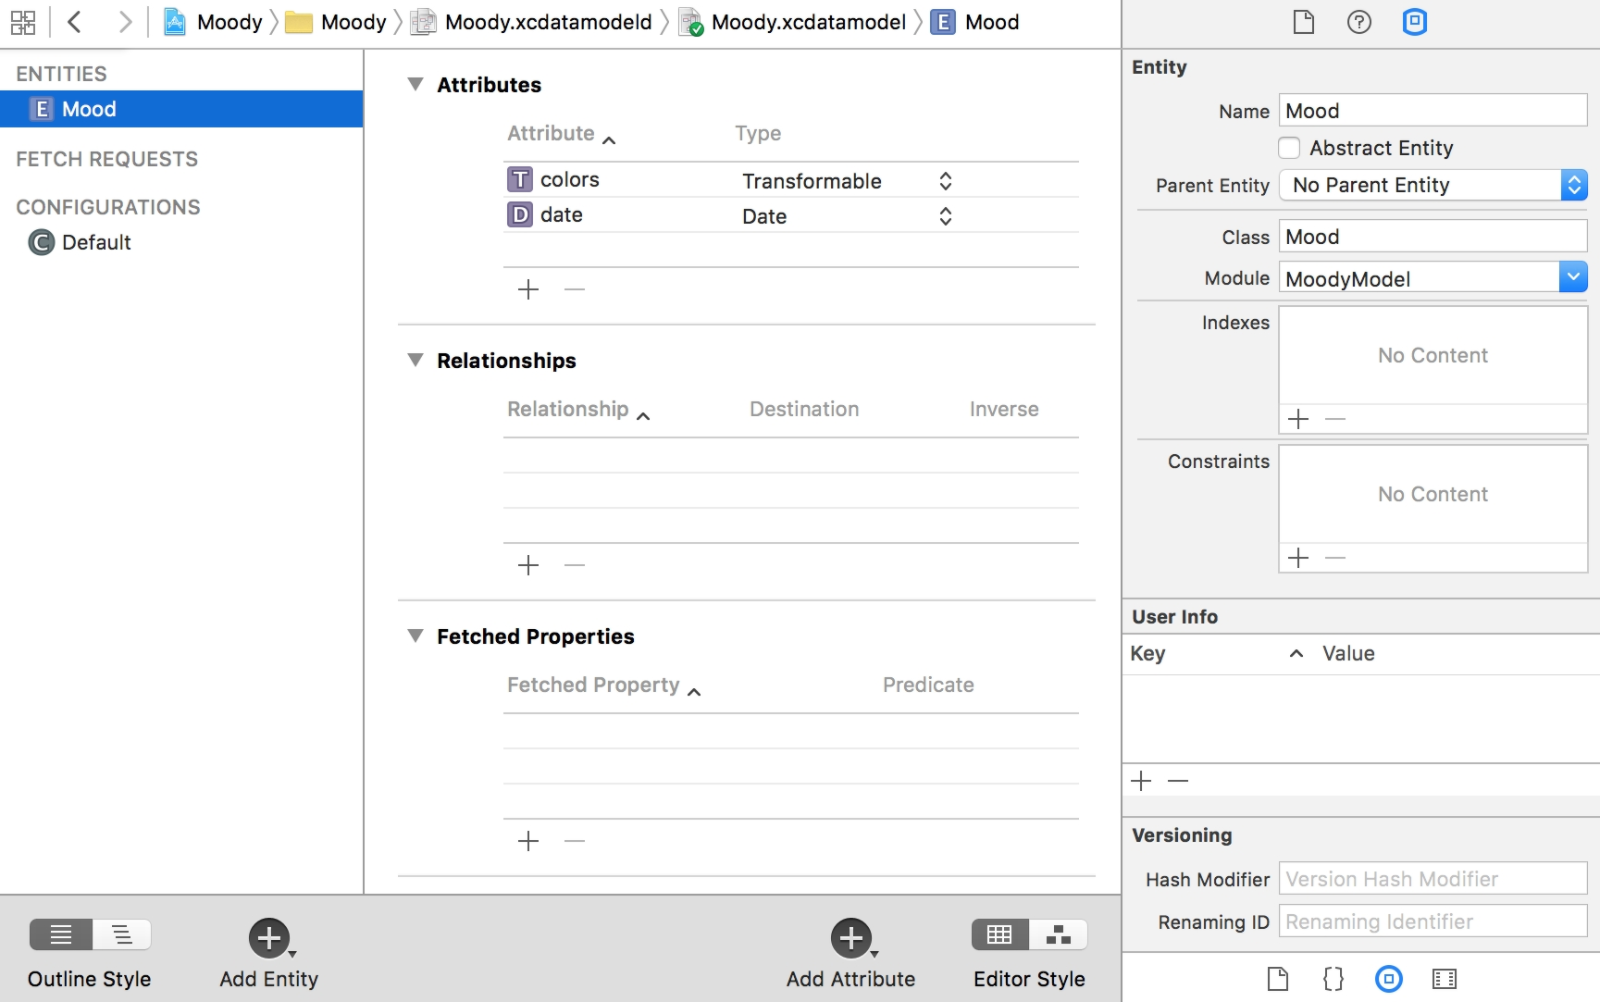
Everything that you can do in the Model Editor has corresponding APIs; you can build the model entirely in code. But the GUI is usually much more efficient.
Entity
An entity is like a table in SQLite. The relationship between entity and managed object is like table ↔ row, or class ↔ instance.
The left sidebar of the screenshot shows the existing entities; you can add new ones with the “Add Entity” button bottom‑left. The middle pane lists attributes and relationships. Most of the time you’ll be adding/removing attributes and relationships here.
On the right is the entity inspector. A few notable fields:
- Indexes: define indexes for the entity. If you’re familiar with relational databases, this is the same concept. In newer Xcode versions, adding indexes moved into the bottom‑left “Add Entity” menu.
- Constraints: uniqueness constraints. You can specify attribute names here; e.g. for a
Userentity, you might add a uniqueness constraint onid, and Core Data will ensure there are no two differentUserrows with the sameid. - Versioning: controls how Core Data computes the entity version hash, which is used for automatic store migration. Simple changes like adding/removing attributes are handled automatically, but renames or index changes usually require extra information so Core Data can migrate data correctly.
Attribute
Attributes support many value types:
- Numeric: various integer and floating‑point types, plus
Decimalfor base‑10 math.Boolis also stored as 0/1 under the hood. The Swift property type on your managed object subclass must match the configured attribute type. - String: fully Unicode‑aware.
- Date: Core Data has a
Datetype, which is basically a timestamp under the hood. - Binary Data: maps to Swift’s
Data.- For this type, Core Data offers Allows External Storage. If enabled, Core Data decides whether to store the data inline in the SQLite row or in a separate file, based on size.
- Beware: large blobs impact both disk and memory usage. To fully materialize a managed object, Core Data must load its binary attributes into memory.
- Transformable: a hook for storing custom types. Transformables are persisted as
Data. To use a transformable, you provide a customValueTransformersubclass that converts between your type andData. Core Data calls it when reading/writing.
A few caveats:
- Core Data only considers a transformable attribute “changed” if you assign a new instance. For reference types, mutating properties in place does not mark the attribute as changed. For value types (structs), this isn’t an issue.
- Before reaching for transformables, consider whether relationships or denormalization might be a better fit. Transformables are not free: every time a row traverses between the persistent store and the context, each transformable attribute must be converted to/from
Data. This is both CPU and memory overhead.
- UUID and URI: supported but used less often.
On the right, attributes have additional flags:
- Optional: whether the attribute can be
nil. If you’re adding a new attribute to an existing entity and you don’t supply a default value, you must mark it optional. Otherwise Core Data won’t know how to prefill the new column during migration, and the stack fails to initialize at next launch. - Validation: Core Data can validate attributes before saving. If validation fails, the entire save fails. You can configure simple validations in the Model Editor—e.g. min/max for numbers, regex for strings—and also add more complex validations in code.
- Derived/Transient: both indicate attributes that are derived from others. The difference is subtle and out of scope here; Apple’s WWDC talk “Session 118: Advanced Core Data” (2010) has a good explanation.
Relationship
Relationships are a core feature of Core Data. They are the glue that turns isolated entities into an object graph.
As with attributes, you configure relationships in the Model Editor.
For example, consider this model:
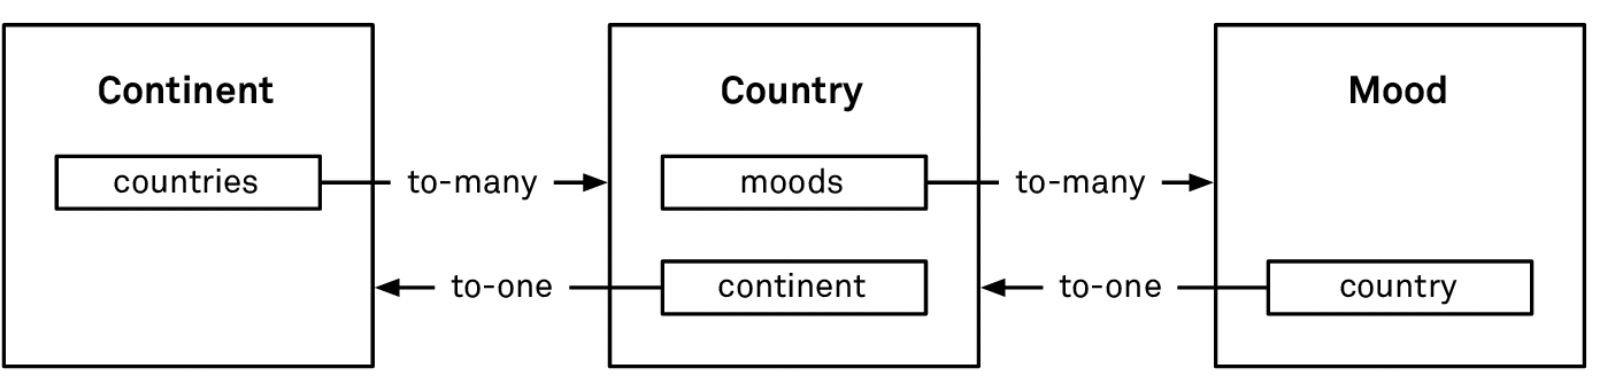
Core Data supports two cardinalities:
- To-One: e.g.
Country.continent—a country belongs to one continent. - To-Many: e.g.
Continent.countries—a continent contains multiple countries. To‑many relationships are unordered by default (NSSet), but can be marked as ordered (NSOrderedSet), where order is insertion order.
Relationships can be between different entities or within the same entity. For example, a tree structure can be modeled with a Node entity that has parent/children relationships to itself.
Relationships should come in inverse pairs. In the example above, when you create the Country.continent relationship, you should also create the inverse Continent.countries. The inverse isn’t strictly required, but is strongly recommended: Core Data then maintains relationship consistency for you.
Without inverses, you must maintain consistency manually. For example, if you delete a Continent, you must remember to set continent = nil on all of its Countrys to avoid dangling references.
Deletion Rule
How does Core Data keep relationships consistent when objects are deleted? Via the deletion rule.
The deletion rule describes what to do with related objects when a given object is deleted. There are four built‑in rules; three are commonly used.
-
Nullify (default):
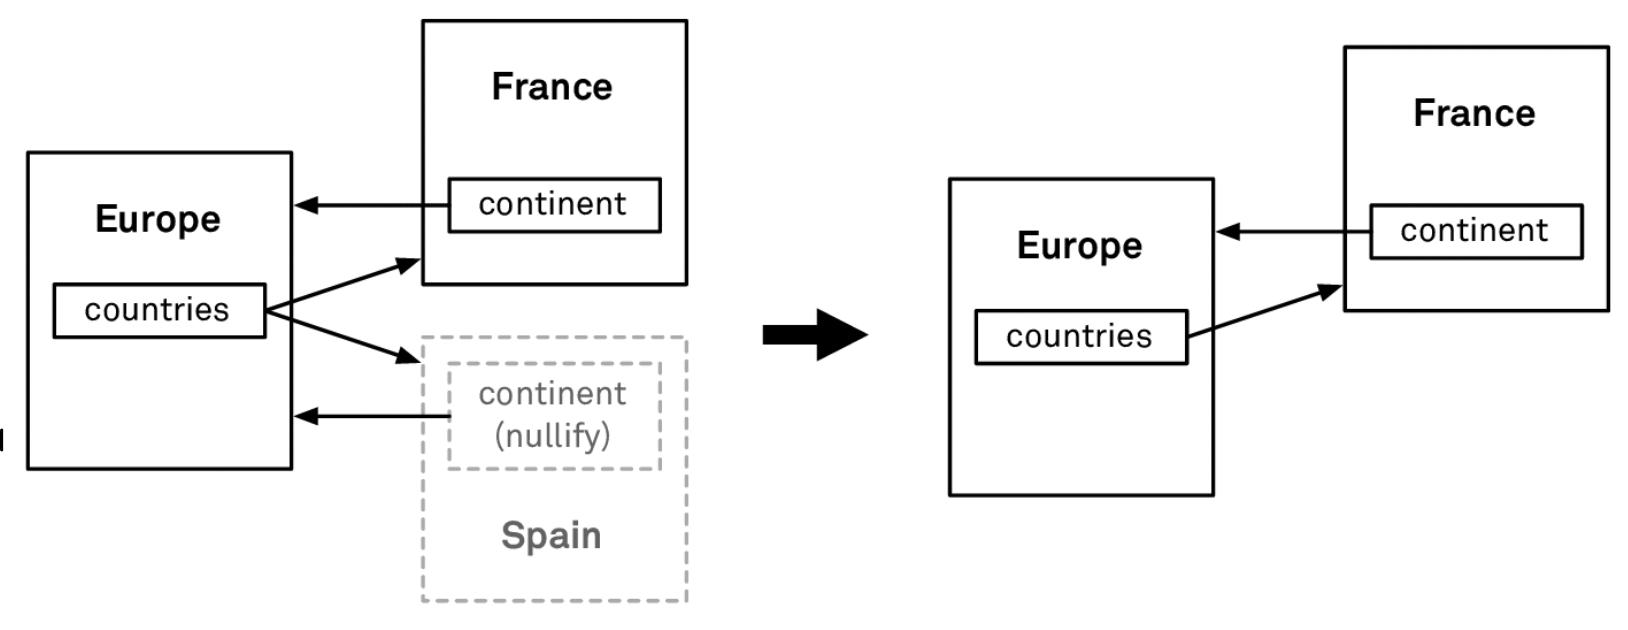
If we set the deletion rule of
Country.continenttoNullify, then when aCountrylike Spain is deleted, Core Data automatically removes Spain fromEurope.countries. -
Cascade:
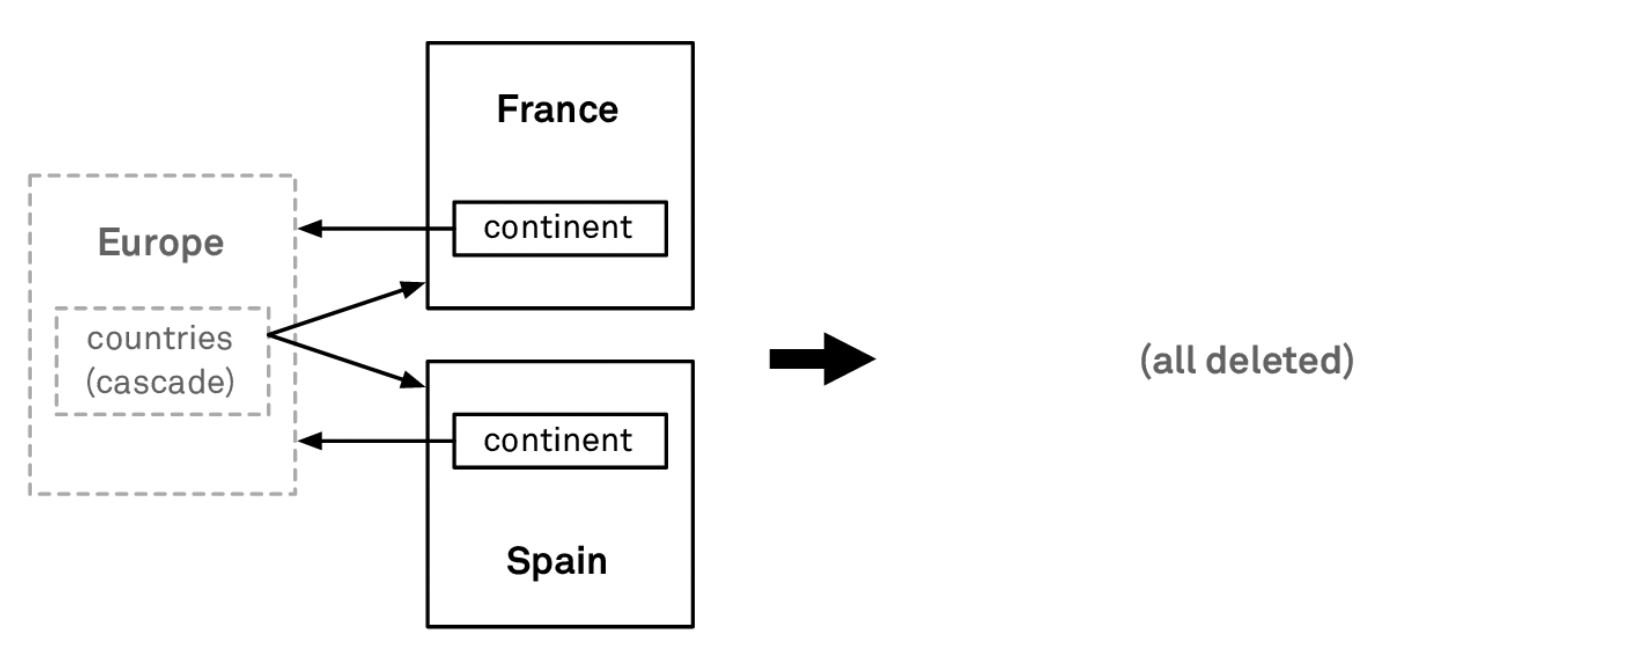
If we set
Continent.countriestoCascade, then deletingEuropewill also delete allCountryobjects inEurope.countries. -
Deny:
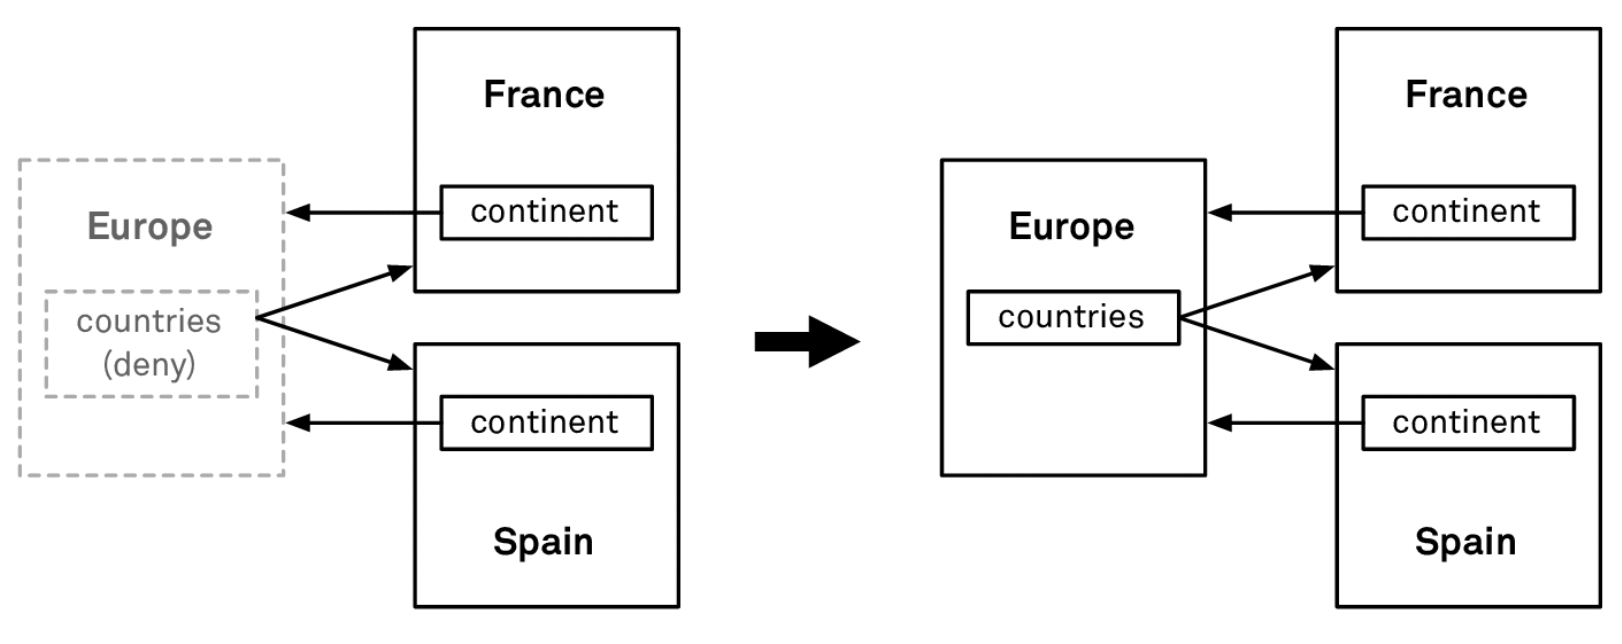
If we set
Continent.countriestoDeny, then attempting to deleteEuropewill fail ifcountriesis non‑empty.
Most use cases can be handled with these three rules. If you need more control, you can override prepareForDeletion on your managed object subclass and implement custom cleanup.
Subentities
We skipped Parent Entity earlier—this is where subentities come in.
Subentities are like inheritance in OOP: a child entity inherits the parent’s attributes and relationships. To use subentities, mark the parent entity as Abstract and set it as the parent for the child entities.
The primary use case is fetching polymorphic data. For example, imagine an IM app with a conversation list that includes both User and Group items. Ideally, we’d like to fetch them in a single query and display them in one list, sorted by the time of the last message.
However, a fetch request can only have one entity type. You could issue two fetches—one for users and one for groups—and then merge and sort in memory, but that:
- Doubles query time.
- Prevents you from fully leveraging SQLite’s built‑in sorting.
Instead, you can define an abstract Contact entity, and make User and Group subentities of Contact. The fetch request can then target Contact, and Core Data returns a mix of User and Group instances.
Important: subentities are not a tool for avoiding duplicate attributes. Do not introduce a generic entity just to DRY up fields.
In the conversation example, Core Data will create a single ZCONTACT table in SQLite. User and Group do not get their own tables; all of their attributes are combined into one wide table. If your business grows and the schema gets more complex, you’ll end up with a very wide table with many columns and many rows, which hurts query performance.
Summary
- Use Xcode’s Model Editor to design your model.
- Relationships play a central role in Core Data.
- Use subentities cautiously; they’re for polymorphic fetches, not deduping fields.
Fetching Data
With the model in place, let’s see how to fetch data.
Fetch Request
The most direct way is a NSFetchRequest. For example:
let request = NSFetchRequest<Continent>(entityName: "Continent")
let continents = try! context.fetch(request)
The rough flow looks like this:
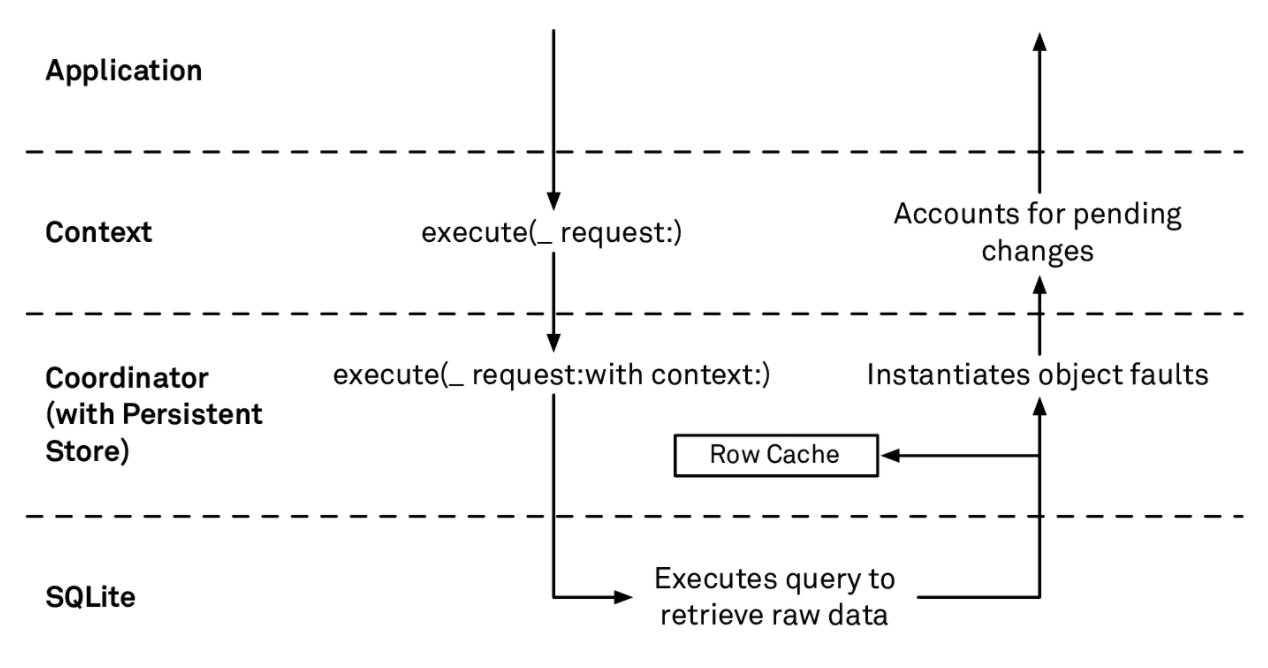
- The context calls
execute(_:request:)on the PSC. - The PSC calls
execute(_:request:with:)on the persistent store. - The store translates the fetch request into SQL and sends it to SQLite.
- SQLite executes the query and fills a row cache. The row cache is a dictionary keyed by
objectIDcontaining raw column values for each row. - SQLite also streams rows back to the store; the store asks the context for managed objects via
object(with:)for eachobjectID. - The PSC returns the managed objects to the context.
- The context applies pending changes (e.g. unsaved deletions or updates in this context) on top of the fetched results—removing deleted objects, applying in‑memory changes—and then returns the array to the caller.
You might wonder what the row cache is for—we’ll get to that next.
Faults
The Continent objects returned by fetch initially are faults: their attributes are not yet loaded. A fault is a lightweight placeholder that becomes a full materialized object on demand.
Core Data would hit the row cache or disk to load the actual values only when you first access an attribute. This is called trigger fullfill or fire fault a fault.
There are two exceptions:
- If the fetch result includes an object that’s already fully materialized in the context, Core Data will reuse it instead of returning a fault.
- If you set the fetch request’s
returnsObjectsAsFaultstofalse, Core Data fully materializes all results immediately.
The main reason for faults is to reduce memory usage and defer work.
When a fault is fired, the flow is roughly:
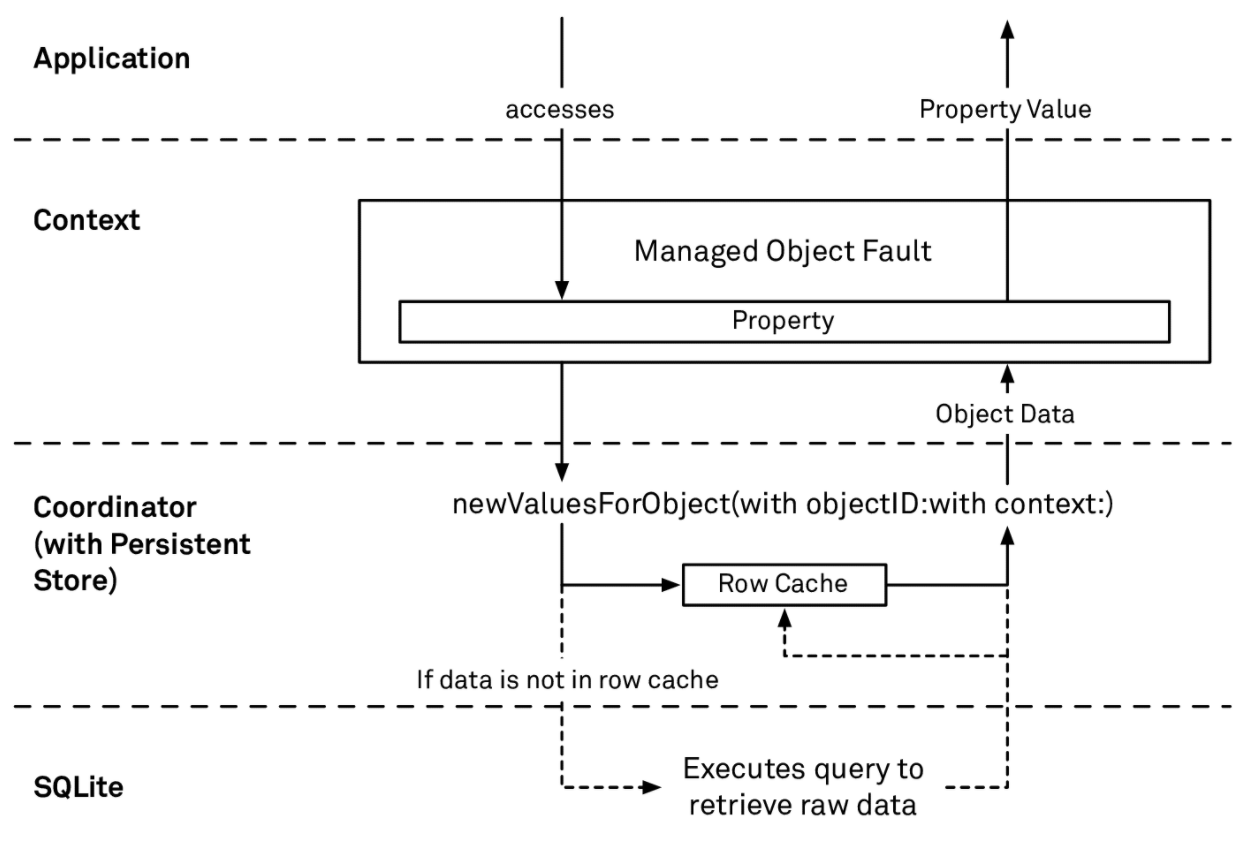
- The object’s
willAccessValue(forKey:)is called. It checks if the object is a fault. - If so, the context asks the PSC for data.
- The PSC asks the store.
- The store calls
newValuesForObject(with:with:).- If the row cache has data for this
objectID, it returns it directly. - Otherwise, it queries SQLite, populates the row cache, and returns the data.
- If the row cache has data for this
- The PSC returns the data to the context, which populates the managed object’s fields.
So the row cache is there to speed up fault firing: it lets Core Data fill attributes without going back to disk.
Result Types
Fetch requests support four result types:
.managedObjectResultType(default): returns full managed objects..managedObjectIDResultType: returns onlyNSManagedObjectIDs.- Even though only IDs are returned, Core Data still queries all columns and populates the row cache. If you truly only need IDs and will never fire those objects, set
includesPropertyValuestofalsefor better performance.
- Even though only IDs are returned, Core Data still queries all columns and populates the row cache. If you truly only need IDs and will never fire those objects, set
.dictionaryResultType: returns dictionaries where you choose which properties are fetched.- Useful when you only need a subset of fields and don’t want to materialize whole objects—reduces memory usage.
- Important: dictionary results are fetched only from the persistent store; pending changes in the context are not applied.
.countResultType: returns just the count. If you don’t need actual objects, always use this for better performance.
Relationships
Fetch requests aren’t the only way to load data; you can also traverse relationships.
In fact, you should prefer relationships where reasonable, because every fetch triggers a context↔SQLite round trip.
Relationships have their own notion of faults: relationship faults. For to‑one and to‑many relationships, the firing behavior differs slightly.
-
For a to‑one relationship like
Country.continent, the first access causes Core Data to fetch the relatedContinentobjectID and create a fault object. Only when you later access that continent’s attributes is it fully materialized. -
For a to‑many relationship like
Continent.countries, the first access fetches theobjectIDs of the related countries and returns a set of fault objects. Accessing an individualCountry’s attribute fires that one object; the others remain faults.
Other Ways to Get Objects
Besides fetches and relationship traversal, contexts offer a few more APIs:
registeredObject(for:)- Looks only at the context’s registered objects. If an object for the given
objectIDexists, it returns it; otherwise,nil. No I/O.
- Looks only at the context’s registered objects. If an object for the given
object(with:)- Returns a fault for the given
objectIDwithout checking anything. If the ID is invalid, you’ll crash when you later access attributes. - Because it does no validation or I/O, it’s extremely fast.
- Returns a fault for the given
existingObject(with:)- If the context already has a registered object, it returns that.
- Otherwise, it queries SQLite for the row. Because it may hit disk, it’s slower.
Summary
- Every fetch request causes at least one context↔SQLite round trip.
- Core Data uses faults to implement lazy loading and reduce memory use.
Saving Data
Now that we can read data, how do we save it?
Core Data saves are transactional: either all changes are saved, or none are. You’ll never be left with a partially written transaction.
context.save()
Saving usually means calling context.save(). Internally, Core Data runs through roughly these steps:
- Calls
processPendingChanges, which applies deletion rules and updates inverse relationships. - Posts
NSManagedObjectContextObjectsDidChangenotification. - Posts
NSManagedObjectContextWillSavenotification. - Validates each object.
- If any object fails validation, the entire save fails.
- Calls
willSaveon each object. - Builds an
NSSaveChangesRequestcontaining inserted/updated/deleted/locked objects.lockedObjectsare objects that weren’t changed themselves but are involved in conflict resolution.
- The PSC asks the store to assign permanent
objectIDs to inserted objects. - The PSC passes the save request to the store.
- The store checks for conflicts and resolves them according to the merge policy.
- If there are no conflicts, or conflicts are resolved, the store converts the save request into SQL and sends it to SQLite.
- The PSC updates its row cache.
- Core Data calls
didSaveon each object. - Posts
NSManagedObjectContextDidSavenotification.
Conflicts
With a single context, you never see conflicts. But with multiple contexts working concurrently, conflicts become possible—just like merge conflicts in Git when two commits modify the same line.
Core Data uses optimistic locking: it assumes there will not be conflicts and only checks at save time.
Conflicts are resolved according to a merge policy. Like deletion rules, Core Data provides several predefined policies:
- Object‑level:
NSRollbackMergePolicy: if an object conflicts, rollback the in‑memory changes in the context.NSOverwriteMergePolicy: if an object conflicts, overwrite the store with the context’s version.
- Property‑level:
NSMergeByPropertyStoreTrumpMergePolicy: for conflicting properties, keep store values; non‑conflicting properties are saved.NSMergeByPropertyObjectTrumpMergePolicy: for conflicting properties, keep context values; non‑conflicting properties are saved.
You can also write custom merge policies in code, but that’s beyond this post.
Batch Update
In iOS 8 and 9, Apple added Batch Update and Batch Delete APIs to perform large changes directly at the SQLite level.
Why so late? Because batch APIs essentially bypass Core Data’s normal machinery: they operate directly on SQLite. That makes them very fast—but also dangerous if misused. They skip conflict resolution, inverse relationship updates, etc., and can leave your object graph inconsistent or crash your app.
For details and examples, see this excellent article on NSBatchDeleteRequest.
Summary
- Saves may encounter conflicts; merge policies determine how those are resolved.
- Batch APIs are powerful but easy to misuse; handle with care.
Performance Tuning
Performance is more than raw speed; it includes latency, memory, power, etc.
In the real world, resources are limited, and you can’t optimize everything at once. Performance work is always about trade‑offs.
Profiling First
Before optimizing, measure. Avoid guessing.
SQL Debug Output
SQL debug output is the fastest way to find slow queries. Turn it on by adding a launch argument in the Xcode scheme:
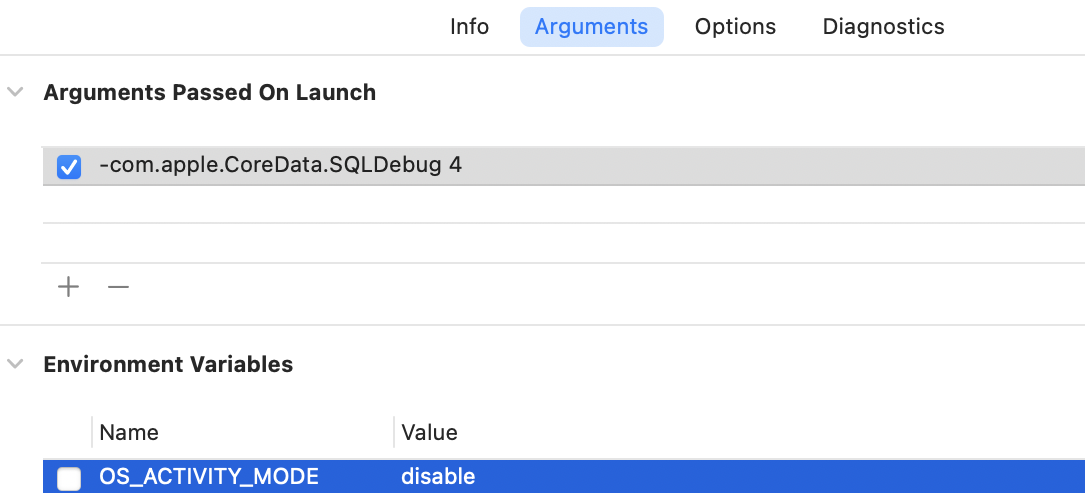
The 4 here is a verbosity level; 1–4, higher means more detail. One important note: if you’ve set OS_ACTIVITY_MODE in your scheme, remove it, or you won’t see the SQL debug output.
With this enabled, running your app and executing fetches will print Core Data’s SQL to the console. A typical snippet:
sql: SELECT t0.Z_ENT, t0.Z_PK
FROM ZGEOGRAPHICREGION t0
WHERE t0.ZMARKEDFORDELETIONDATE = ?
ORDER BY t0.ZUPDATEDAT DESC
annotation: sql connection fetch time: 0.0004s
annotation: total fetch execution time: 0.0007s for 5 rows.
This shows the generated SQL, plus timings. Here, the total fetch took 0.7 ms.
Below that you’ll often see query planner output:
sqlite> EXPLAIN QUERY PLAN
SELECT t0.Z_ENT, t0.Z_PK
FROM ZGEOGRAPHICREGION t0
WHERE t0.ZMARKEDFORDELETIONDATE = ?
ORDER BY t0.ZUPDATEDAT DESC;

0|0|0|SEARCH TABLE ZGEOGRAPHICREGION AS t0 USING INDEX ZGEOGRAPHICREGION_ZMARKEDFORDELETIONDATE_INDEX (ZMARKEDFORDELETIONDATE=?)
0|0|0|USE TEMP B-TREE FOR ORDER BY
This is SQLite’s query planner explaining how it will run the query: it uses the ZGEOGRAPHICREGION_ZMARKEDFORDELETIONDATE_INDEX index and a temporary B‑tree for sorting.
In practice, you mostly care about these two parts:
- Timings, which let you quickly spot slow queries.
- Query plans, which guide indexing and query rewriting.
If your app does many fetches, the debug output can be overwhelming. A practical trick: put a breakpoint right before the fetch you care about, then single‑step over it. The SQL output at the bottom of the console will belong to that specific fetch.
Also note: SQL debug output affects performance. Turn it off when using Instruments’ Time Profiler.
Instruments
SQL debug output is great for slow queries, but doesn’t show save times, faulting overhead, etc. For that, use Instruments’ Core Data template:
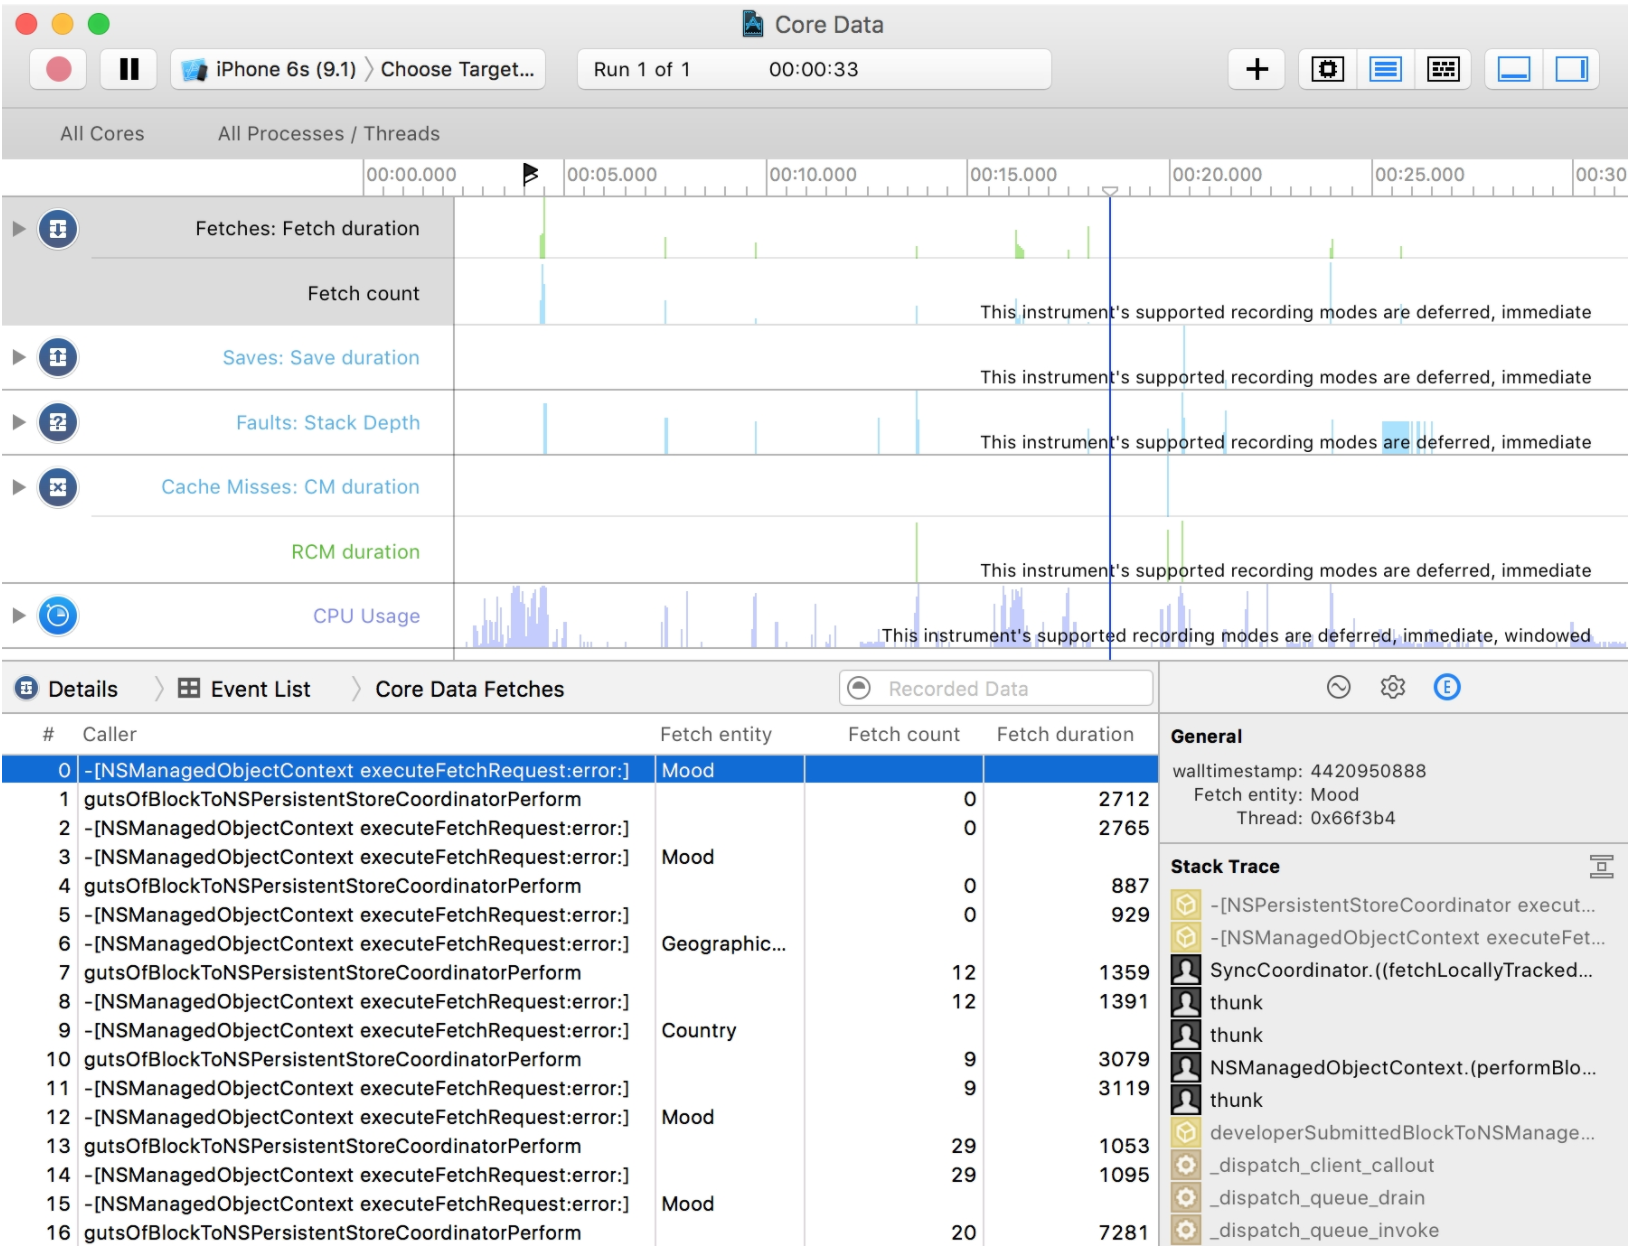
You get:
- Fetches: when fetches occur, how many objects they return, and timings.
- Saves: analogous details for saves.
- Faults: fault firing activity.
- Cache Misses: fault fires that miss the row cache and hit SQLite.
Performance Characteristics
At a high level, the Core Data stack has three layers with very different costs:
- Context layer: extremely fast. Operations here are lock‑free. A key rule when using Core Data: never access objects across contexts. Only use objects on their own context’s queue.
- Coordinator layer: slower. The PSC uses internal locks for thread safety. If multiple contexts talk to the same PSC, only one can be active at a time.
- SQL layer: slowest. SQLite uses file locks to prevent concurrent writes to the same DB. And I/O is always slower than in‑memory operations.
Optimization Strategies
Most of my production scenarios are read‑heavy, so the following is biased toward reads. Concrete optimization always depends on the specific problem, but some patterns are broadly useful.
Before anything else, remember:
Talking about performance without discussing load is meaningless.
If you’re building a small to‑do app with only a few dozen rows, there’s no need to obsess over Core Data optimization. Spend that time improving the product.
Avoid Unnecessary Fetches
Recall that each fetch causes a context↔SQLite round trip. The fastest fetch is the one you don’t do.
Try to rely on relationships where possible—for example, navigating from a User to its messages—instead of issuing new fetches.
Use Indexes
Indexes are my most frequently used performance tool. SQLite’s query planner docs are excellent; read them if you’re not already familiar with indexing.
Indexes improve:
- Lookup speed: turning table scans into index lookups.
- Sort speed: because indexes are ordered, SQLite can often use them to satisfy
ORDER BYwithout an extra sort. In the best case, it can return rows in the desired order directly from the index.
Indexes are a double‑edged sword: they cost disk space and slow down writes (every insert/update needs to update indexes). If your workload is read‑heavy, they’re usually worth it. But always measure.
Let SQLite Sort
Even without indexes, let SQLite handle sorting instead of fetching all rows and sorting in memory. In‑memory sorting almost always fires all faults first, which is unnecessary work if you only need the sort key and a small subset of fields.
Avoid Bulk Fault Firing
If you have many fault objects and later touch them all, you’ll incur many small fetches.
If you know ahead of time that you need the full data, set returnsObjectsAsFaults = false to fetch materialized objects in one go.
Prefetch Relationships
With returnsObjectsAsFaults = false, Core Data prefetches to‑one relationships by fetching the related objectIDs. For to‑many relationships, it does nothing by default; accessing them later will trigger relationship faults.
If you know you’ll immediately use a relationship (e.g. child rows in a table), set relationshipKeyPathsForPrefetching on the fetch request. Core Data will fetch those related objects too, reducing faulting.
If you find yourself prefetching lots of relationships, it may be a sign that your model needs redesign.
Avoid Huge To‑Manys
Try to avoid relationships that can grow without bound.
For example, in an IM app, you might model a conversation with Conversation.messages. Since messages are effectively never deleted, that relationship grows large over time.
When you add a new Message to Conversation.messages, Core Data must keep the inverse relationship consistent. In practice (based on SQL debug output), this means it often fetches all existing messages for the conversation to update the inverse. That quickly becomes a performance and memory problem.
So avoid relationships like Conversation.messages that can span thousands of objects. Consider alternatives like a conversationID field and fetches.
Put More Selective Predicates First
This is a more general optimization tip, not Core‑Data‑specific.
Say you need the number of failed messages sent by the current user to show as a badge. A natural predicate might be:
let predicate = NSPredicate(format: "senderID == %@ AND sendFailed == TRUE", user.id)
Assuming no indexes, SQLite has to scan every Message row and test the predicate. For each row:
- Check
senderID.- If it matches, then check
sendFailed.- If both match, include the row.
- If it matches, then check
- If
senderIDdoesn’t match, skip directly to the next row.
In most real chats, there are far more successful messages than failed ones. In other words, sendFailed == TRUE is much more selective than senderID == user.id. Reordering the predicate can help:
let predicate = NSPredicate(format: "sendFailed == TRUE AND senderID == %@", user.id)
Now SQLite first checks sendFailed. For almost all rows, this is false, so it can skip checking senderID and avoid extra column reads.
If you have indexes, SQLite chooses the best index regardless of predicate order, so this only matters when no index is used. Still, it doesn’t hurt to order predicates from most to least selective.
Denormalize Where It Helps
When modeling, it’s tempting to split everything into many small entities with single responsibilities—that’s what we’re taught in OO design.
For databases, sometimes you need to go the other way and denormalize.
Consider a table view cell. Ideally, everything needed to populate that cell can be fetched from a single entity. If data is split across multiple entities, each cell may require additional fetches, which is very expensive when your data source is large.
In such cases, it’s often better to inline a few fields into a single entity and avoid extra relationships.
Summary
- Performance work is about trade‑offs.
- There are no silver bullets; always measure before and after.
- Start with profiling, then optimize, then profile again.
Conclusion
This post introduced the main concepts and internals of Core Data, then covered reading/writing data and some performance tips.
Core Data is a large framework, and this barely scratches the surface. Topics I didn’t cover include, but are not limited to:
- How Core Data handles concurrency.
- Data model versioning and migrations.
- Integrating Core Data with CloudKit.
For deeper study, see the references below.